
Friday, December 2, 2011
New Blog URL!
I've switched blog urls! sandwhichjedi.blogspot.com should automatically be redirected here to louisjmorton.blogspot.com. Please switch your link to this new url. Thanks!
Wednesday, November 30, 2011


Sunday, November 27, 2011
Plants and Time
An editing exercise using footage from the Internet Archive and the music of John Baker.
Friday, October 28, 2011
Tuesday, October 18, 2011
SHAPES
Here are some pics from the green screen shoot directed by Amy Lee Ketchum and I. The footage will be used in our collaborative film. Not sure of the title yet, so just calling it SHAPES for now.


Tuesday, October 4, 2011
Friday, September 30, 2011
Adult Workers
After researching costumes the shape adults developed into more of the worker type, with physically constructed heads and coverall worker suits instead of drawn heads and spandex.


Adults
Initial ideas for the shapes once they reach adult land and are divided by their shape and color. This part of the film will be live actors with green screen and 2D backgrounds.


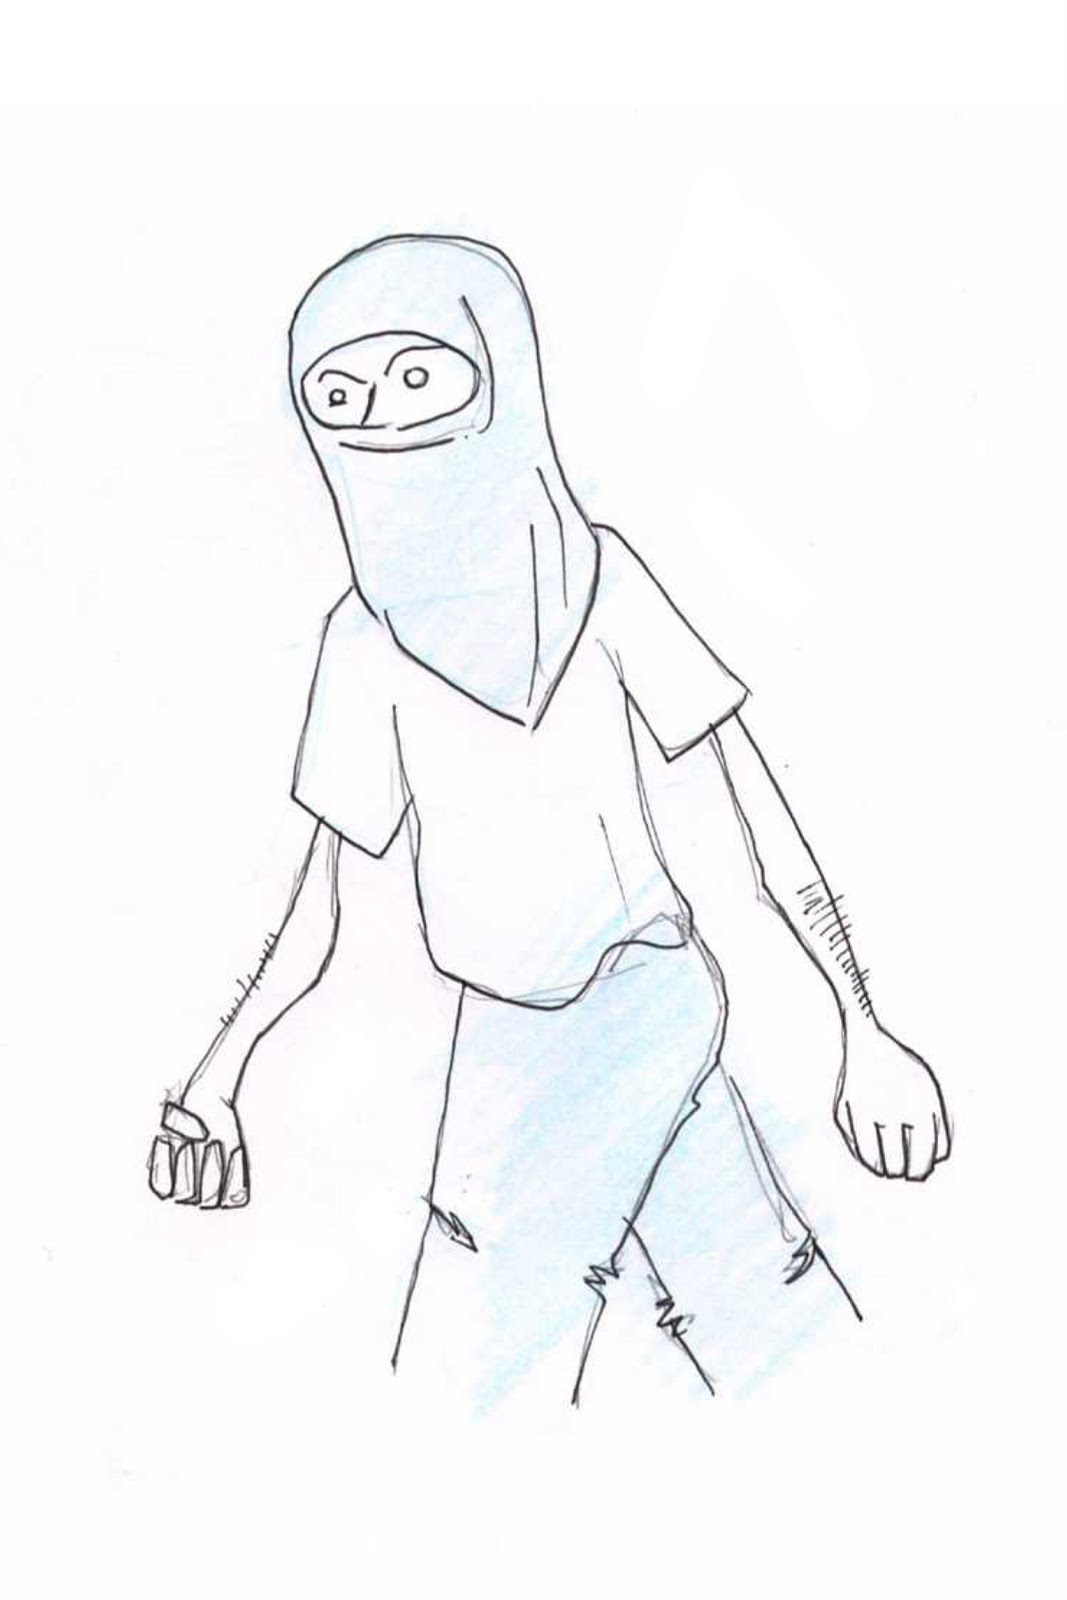
Shapes Concept Art
I'm working on a collaborative film with Amy Lee Ketchum. using the music of Andy Puls. The story is of a shape that grows up. It's kind of a two-part or diptych. Here is some of the concept art I've been developing on my end. The beginning of the film will be digital 2D, 3 simple shapes with legs frolic about in the colorful landscape of childhood.


Thursday, September 29, 2011
Tuesday, September 20, 2011
Lego Animation
Exercise animating Legos. I was surprised at how much I enjoyed this exercise, especially playing with camera angles and cutting. Very easy to experiment with these things when the subjects are so small.
Monday, September 12, 2011
Thursday, September 8, 2011
Edit Dance
I've really been enjoying experimenting with video editing this past week. Stock images edited to stock music makes this:
Monday, September 5, 2011
PiKA PiKA at USC
PiKA PiKA, the world famous Japanese animation group that has popularized light animation was here last week at USC! I helped wrangle people around this giant face the night of the event, and also did a super lightning fast edit and compilation of all the footage of the evening to be shown the same night. (And by edit I mean I followed the directions outlined by Tochka (the animation group) the night before).
Here is the first part of the workshop, a giant face:

Photo courtesy of Jovanna Tosello.
PiKA PiKA's inspiring work: http://tochka.jp/pikapika/
Here is the first part of the workshop, a giant face:

PiKA PiKA's inspiring work: http://tochka.jp/pikapika/
Tuesday, August 30, 2011
Object Animation Exercise
This past week I've been getting back into the flow of the grad program. It's been a little bit since I've hunkered down and done some good ole stop motion animating. I've been animating in Flash all summer and helping out with all aspects on various stop motion projects BUT animation. Needless to say, I felt a bit rusty. So here is my attempt at getting back into the groove with a first go at the classic found object animation exercise.
Wednesday, August 17, 2011
Bix Pix
I just finished up the last day of my one-day-a-week summer internship at Bix Pix.

I'm a huge fan of their work and it was awesome to help out on a few summer projects, the largest of which was a series of spots for Kreo Transformer commercials. Here is a clip of one of the commercials that the studio produced:
I was mostly just on hand for any assistance of grabbing lights, stands and things as needed. But I did fabricate a few things in one of the spots to air later!
Saturday, August 6, 2011
Mold Making Part 4: Taking Out the Sculpt
 After the plaster from the bottom half sets, the mold can be separated and the puppet can be removed!
 The mold reveals an empty cavity of where the puppet was. This can be filled with all sorts of different materials, in this case it will be foam rubber.
 The mold will need a small bit of cleanup, there are some air bubbles that may need to be filled and some ridges that may need to be sanded down.
Mold Making Part 3: Plaster Build-up on the Other Side
 The top half of the mold is flipped around and the clay buildup from Step 2 has been removed, revealing the Egg butt-side up!
 The next step is to build a thin layer of clay a quarter inch offset around the Egg. This will leave a thin trough surrounding the puppet. The clay will create a cavity that will not be filled with plaster creating a ridge of plaster directly surrounding the puppet. This will ultimately create a much tighter seam on the final puppet.
 After the clay ridge is complete, clay walls are again built up around the mold.
 Next the plaster is added in coats, exactly as in Step 2.
 After the final coat is added, the clay wall can be pulled away.
Mold Making Part 2: Clay Build-up and First Plaster Pour
 The next step is to build up the first half of the mold underneath the sculpt. The clay is built up bit by bit around the sculpt until it reached the midsection of the character. The squares on the corners are keys that are used to fit the second half of the mold onto the top. The puppet has tie downs on its feet which are impressed into the clay. This helps when placing the final armature in the mold, the tie downs of the final armature can be lined up with these impressions.
 Next a clay wall is built around the mold. This will allow Justin to pour in the plaster over the sculpt to create the top half of the mold.
 Once the clay wall is finished, the next step is to pour in the plaster.
 The first coat is called a splash coat, it's thinner than the rest of the coats, about the consistency of a heavy cream.
 Once the splash coat is added, a heavier mixed coat is applied, about the consistency of pancake batter.
 Next, sheets of burlap are dipped into plaster and criss-crossed onto the next layer. This will make the overall mold much stronger.
 After the burlap sheets are added a final coat of plaster is applied, again mixed to the consistency of pancake batter.
 Once the final coat is applied, the clay wall can be removed. The plaster has already started to set and harden.
The plaster is then burnished with piece of burlap. Also any ridges and bumps of plaster are removed. This makes the mold much smoother and cleaner and also eliminates any sharp corners that can cut you later!
Sunday, July 31, 2011
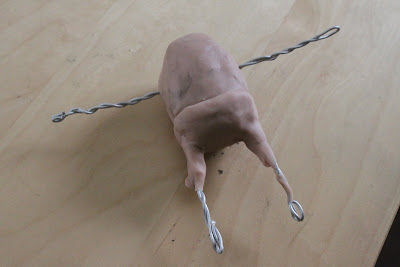
Mold Making Step 1: The Sculpt
Over the next week or so I'll be documenting the process for making the mold for Egg. Much thanks to Justin C for helping me through the process and using the Egg as a demo mold in his awesome mold making class. Basically at the end of this process I will have a mold in the shape of the Egg character that I can used to make as many duplicate puppets as I need (or until the mold wears out).
The first step is making the sculpt of the character. I make a quick and dirty armature by braiding some wire around into the general shape of Egg and built up the shape of Egg around it with Super Sculpy. This picture is from an early version of the sculpt. I forgot to take a picture of the final Egg before it went into the mold! But hopefully this picture gives a general idea.
The next step is then to build up clay around this figure for the bottom half of the mold. Pics of that coming soon!
The first step is making the sculpt of the character. I make a quick and dirty armature by braiding some wire around into the general shape of Egg and built up the shape of Egg around it with Super Sculpy. This picture is from an early version of the sculpt. I forgot to take a picture of the final Egg before it went into the mold! But hopefully this picture gives a general idea.

The next step is then to build up clay around this figure for the bottom half of the mold. Pics of that coming soon!
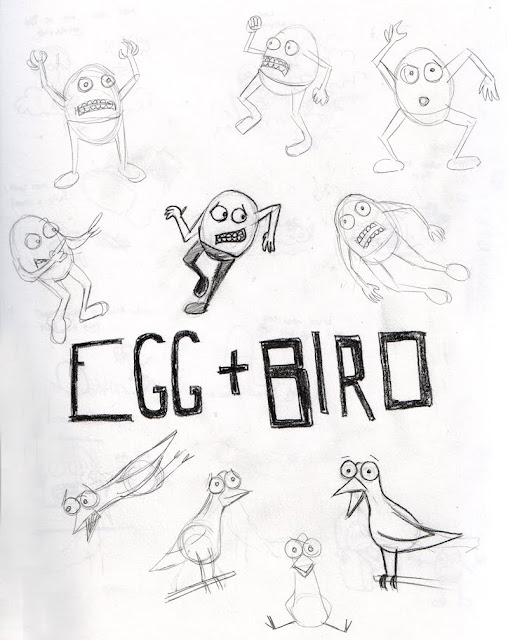
The Eggman is Coming...
I'm starting to work out ideas for my second year film. It will most likely star an Egg and his Bird, two best friends that live in a kitchen and travel to different dimensions by jumping in drawers and cabinets. Here are some sketches. I'm starting to work on sculpting the Egg, pictures will be up soon.

Thursday, July 28, 2011
Flashlight Orchestra, Further Explanation
This small toy flashlight was part of the inspiration of this project.
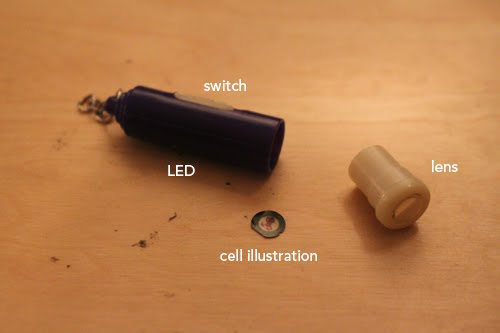
I took it apart and found that it used a pretty simple set up and thought that maybe the cell could be a series of images instead of just one.
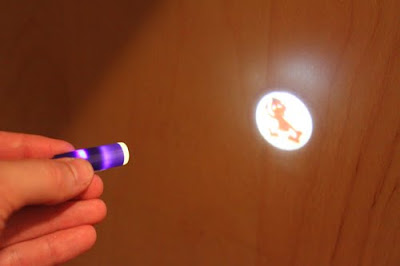
After some further research I found this old animation machine. Though much larger, it uses a similar design, where a large glass disk is spun and a Gleisser tube flashes light though the transparencies to create a weak projection.

So will all of this fit into a flashlight? I don't know! But I'm going to start taking apart some larger toy flashlights soon like this one to find out.

I took it apart and found that it used a pretty simple set up and thought that maybe the cell could be a series of images instead of just one.

After some further research I found this old animation machine. Though much larger, it uses a similar design, where a large glass disk is spun and a Gleisser tube flashes light though the transparencies to create a weak projection.
So will all of this fit into a flashlight? I don't know! But I'm going to start taking apart some larger toy flashlights soon like this one to find out.
Monday, July 18, 2011
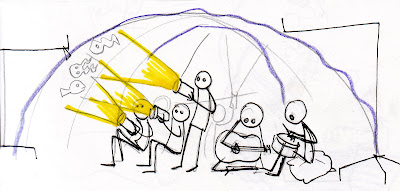
Flashlight Orchestra
Currently in the midst of brainstorming a new installation / product / animation idea. Here is an official proposal I wrote up:
Inspired by cave paintings, flashlights, early animation devices and visual music, I'd like to create a space where an audience can interactively create visuals to accompany a live musical performance. I will design a hand cranked animation flashlight that essentially allows one to project a simple animation cycle. 15-20 people will be given these flashlights and invited into a fort made out of paper or blankets. While a live group of musicians plays campfire jingles the audience will be invited to project their animated flashlights onto the fort walls. Each flashlight will contain a different animated sequence. The audience can choose how the animated sequences interact and hopefully spontaneous and unique stories will develop with each performance.
Proposed design for the flashlight:

Drawing of the proposed fort set-up:

Wednesday, June 15, 2011
Asteroids

I've been having a great time interning for Justin and Shel Rasch for their next film this summer. I made these asteroids and modified a huge one to explode. Their work is amazing and making asteroids is fun. That's about that.
Sunday, June 12, 2011
Moe's on a brochure!

Last week USC held a ceremony dedicated the newly named Jeffery Katzenburg center for animation. Mr. Katzenburg, Mr. Lucas and Mr. Speilburg were all present and each gave a little speech. Much to my surprise Moe made an appearance too. He was all over the banners and brochures. I just plain lucked out here, I happened to be in the cubes when the guy was collecting artwork for the banners. It was still cool to see Moe amongst all the awesome USC work though!
Tuesday, June 7, 2011
Moe is in a fest!

Moe will be making his festival debut in the Long Day Short Film Fest June 21 in Alameda, CA!
Monday, June 6, 2011
Monday, May 30, 2011
Rhythms and Visions
This footage was shot at the Rhythms and Visions event at USC in April. The animation was projected opposite to the main event, the musical and video collective D-FUSE. Some of their images can be see reflected on the wall. The Animation was on loop throughout the entire night.
Thursday, May 19, 2011
Lip Synch Exercise
Here is my final project for stop motion class, a lip synch exercise. I wanted to try out using replacement mouths (for Egg) and a Flapping 'Muppet-style' mouth (for Bird).
Wednesday, May 18, 2011
Miss the Misery
Miss the Misery finally made it's online debut last week. I was fortunate enough to volunteer on this Foo Fighters video back in March. The animation director was Musa Brooker, stop motion extraordinaire. I only volunteered for a day, but I did get to operate the camera for the camera move at 2:59! (Which involved being instructed to turn a dial at minute increments). Still, Foo Fighters were childhood heros of mine, Big Me was the first song I ever learned on guitar, and this was a really awesome experience!
Video was directed by Pete Levin
Video was directed by Pete Levin
Monday, April 25, 2011
Mel and the Vine
Here is the animation that I projected onto the music school last Friday. Mel is the character that appears at the end of Moe's Musical Morning. Video of the actual projection will be up soon!
Monday, April 11, 2011
Moe Running on the Green Screen
Working on runs for the music freak-out sequence. I animated these on a green screen, using a flying rig and removed the rig in After Effects. This is my first time shooting a run, shooting on green screen, and removing a rig in post, so it's definitely been a learning experience! Next step is to key out the green screen and integrate it with the flash animation.
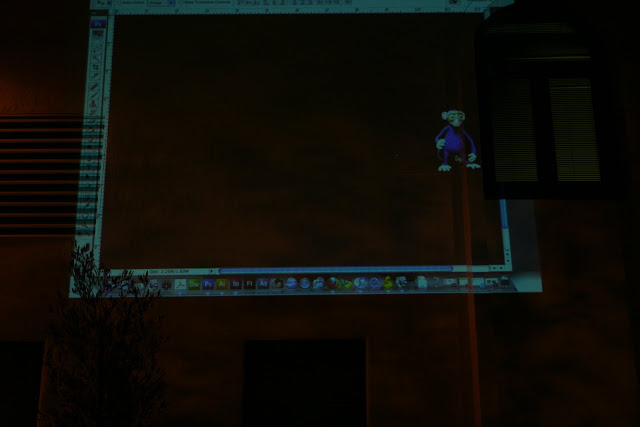
Visions and Voices Prep
I'm working on a projected animation for the upcoming Visions and Voices event at USC. This will involve either Moe or Mel (the orange guy, I changed his name from Max) climbing around on the music building. I've been doing flash tests to get an idea of where I want him to crawl around. I've also been doing some projector tests to figure out how bright the image needs to be. Here are a couple of the tests!

Subscribe to:
Posts (Atom)