This past week I've been getting back into the flow of the grad program. It's been a little bit since I've hunkered down and done some good ole stop motion animating. I've been animating in Flash all summer and helping out with all aspects on various stop motion projects BUT animation. Needless to say, I felt a bit rusty. So here is my attempt at getting back into the groove with a first go at the classic found object animation exercise.

Tuesday, August 30, 2011


Wednesday, August 17, 2011
Bix Pix
I just finished up the last day of my one-day-a-week summer internship at Bix Pix.

I'm a huge fan of their work and it was awesome to help out on a few summer projects, the largest of which was a series of spots for Kreo Transformer commercials. Here is a clip of one of the commercials that the studio produced:
I was mostly just on hand for any assistance of grabbing lights, stands and things as needed. But I did fabricate a few things in one of the spots to air later!
I'm a huge fan of their work and it was awesome to help out on a few summer projects, the largest of which was a series of spots for Kreo Transformer commercials. Here is a clip of one of the commercials that the studio produced:
I was mostly just on hand for any assistance of grabbing lights, stands and things as needed. But I did fabricate a few things in one of the spots to air later!
Saturday, August 6, 2011
Mold Making Part 4: Taking Out the Sculpt
 After the plaster from the bottom half sets, the mold can be separated and the puppet can be removed!
 The mold reveals an empty cavity of where the puppet was. This can be filled with all sorts of different materials, in this case it will be foam rubber.
 The mold will need a small bit of cleanup, there are some air bubbles that may need to be filled and some ridges that may need to be sanded down.
Mold Making Part 3: Plaster Build-up on the Other Side
 The top half of the mold is flipped around and the clay buildup from Step 2 has been removed, revealing the Egg butt-side up!
 The next step is to build a thin layer of clay a quarter inch offset around the Egg. This will leave a thin trough surrounding the puppet. The clay will create a cavity that will not be filled with plaster creating a ridge of plaster directly surrounding the puppet. This will ultimately create a much tighter seam on the final puppet.
 After the clay ridge is complete, clay walls are again built up around the mold.
 Next the plaster is added in coats, exactly as in Step 2.
 After the final coat is added, the clay wall can be pulled away.
Mold Making Part 2: Clay Build-up and First Plaster Pour
 The next step is to build up the first half of the mold underneath the sculpt. The clay is built up bit by bit around the sculpt until it reached the midsection of the character. The squares on the corners are keys that are used to fit the second half of the mold onto the top. The puppet has tie downs on its feet which are impressed into the clay. This helps when placing the final armature in the mold, the tie downs of the final armature can be lined up with these impressions.
 Next a clay wall is built around the mold. This will allow Justin to pour in the plaster over the sculpt to create the top half of the mold.
 Once the clay wall is finished, the next step is to pour in the plaster.
 The first coat is called a splash coat, it's thinner than the rest of the coats, about the consistency of a heavy cream.
 Once the splash coat is added, a heavier mixed coat is applied, about the consistency of pancake batter.
 Next, sheets of burlap are dipped into plaster and criss-crossed onto the next layer. This will make the overall mold much stronger.
 After the burlap sheets are added a final coat of plaster is applied, again mixed to the consistency of pancake batter.
 Once the final coat is applied, the clay wall can be removed. The plaster has already started to set and harden.
The plaster is then burnished with piece of burlap. Also any ridges and bumps of plaster are removed. This makes the mold much smoother and cleaner and also eliminates any sharp corners that can cut you later!
Sunday, July 31, 2011
Mold Making Step 1: The Sculpt
Over the next week or so I'll be documenting the process for making the mold for Egg. Much thanks to Justin C for helping me through the process and using the Egg as a demo mold in his awesome mold making class. Basically at the end of this process I will have a mold in the shape of the Egg character that I can used to make as many duplicate puppets as I need (or until the mold wears out).
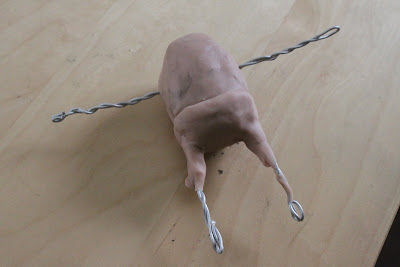
The first step is making the sculpt of the character. I make a quick and dirty armature by braiding some wire around into the general shape of Egg and built up the shape of Egg around it with Super Sculpy. This picture is from an early version of the sculpt. I forgot to take a picture of the final Egg before it went into the mold! But hopefully this picture gives a general idea.
The next step is then to build up clay around this figure for the bottom half of the mold. Pics of that coming soon!
The first step is making the sculpt of the character. I make a quick and dirty armature by braiding some wire around into the general shape of Egg and built up the shape of Egg around it with Super Sculpy. This picture is from an early version of the sculpt. I forgot to take a picture of the final Egg before it went into the mold! But hopefully this picture gives a general idea.

The next step is then to build up clay around this figure for the bottom half of the mold. Pics of that coming soon!
The Eggman is Coming...
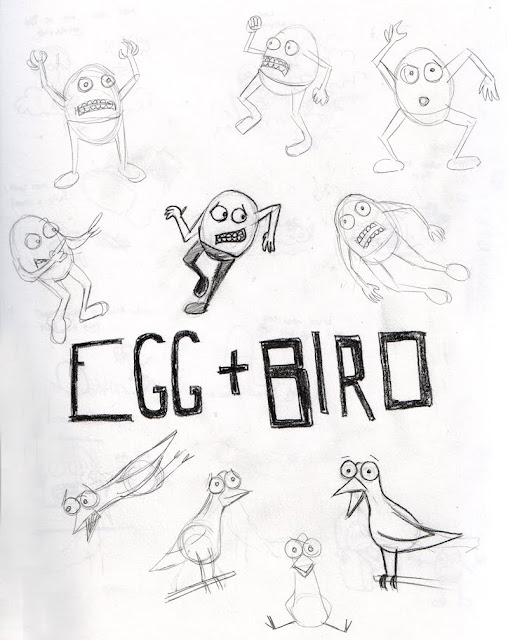
I'm starting to work out ideas for my second year film. It will most likely star an Egg and his Bird, two best friends that live in a kitchen and travel to different dimensions by jumping in drawers and cabinets. Here are some sketches. I'm starting to work on sculpting the Egg, pictures will be up soon.

Subscribe to:
Posts (Atom)